Run guide#
⚠️ Make sure that all of the hosts used are set up according to the host setup.
⚠️ To run pipelines with Media Communications Mesh, make sure that Media Proxy is available.
Note: This instruction regards running the predefined scripts from
pipelinesfolder present in the root of the repository. For more information on how to prepare an own pipeline, see:
Note: The scaling factors provided in this document consider the number of pixels in the image, instead of dimensions, e.g. scaling 1/4 means the number of overall pixel is down by 4, but the edges are divided by 2 (like in 3840x2160 -> 1920x1080).
Run using BCS launcher tool.#
Getting Started#
Prerequisites#
go version v1.22.0+ Install Go
docker version 17.03+. host setup
Access to a Kubernetes v1.11.3+ cluster. (only when Kubernetes mode used)
NOTE! This tool provides an ability to install appropriate media applications on your machine or cluster. Supply appropriate security measures adjusted to the needs of the selected environment.
To Run containers on single node#
step #1 Note that you have to adjust NMOS node configuration file. Examples with use cases you can find under the path <repo>/tests (Files in json format). In config in step #2 this file is defined by keys nmosConfigFileName and nmosConfigPath. Name and path must exist on your host machine. You can refer to ../tests or to definition of NMOS configuration - [../src/nmos/README.md](NMOS README)
step #2 Remember the path of above mentioned configuration NMOS file because it must be provided in the next config below: <repo>/launcher/configuration_files/bcslauncher-static-config.*.yaml.
nmosConfigPath: /example/nnmos/configuration/from/path/<repo>/tests
nmosConfigFileName: intel-nmos-node-example.json
Edit this configuration file under path <repo>/launcher/configuration_files/bcslauncher-static-config-.*.yaml This example shows <repo>/launcher/configuration_files/bcslauncher-static-config-host-net-tx.yaml:
#
# SPDX-FileCopyrightText: Copyright (c) 2024 Intel Corporation
#
# SPDX-License-Identifier: BSD-3-Clause
#
# CONFIGURATION FOR mediaProxyAgent AND mediaProxyMcm MUST BE THE SAME WITHIN THE SAME NETWORK/SETUP
# CONFIGURATION FOR mediaProxyAgent AND mediaProxyMcm IS FOR ONE NODE SCENARIO ONLY

k8s: false # use flag in both modes: k8s | docker
configuration: # Configuration should be used only for docker mode
  runOnce:
    mediaProxyAgent:
      imageAndTag: mcm/mesh-agent:latest # built locally
      gRPCPort: 50051 # this is the port used by the agent
      restPort: 8100
      custom_network: # custom network = false means that the container will be run in the host docker network
        enable: false
    mediaProxyMcm:
      imageAndTag: mcm/media-proxy:latest # built locally
      interfaceName: eth0
      volumes:
        - /dev/vfio:/dev/vfio
      custom_network: # custom network = false means that the container will be run in the host docker network
        enable: false
  workloadToBeRun:
    ffmpegPipeline:
      name: bcs-ffmpeg-pipeline-tx
      imageAndTag: tiber-broadcast-suite:latest # built locally
      gRPCPort: 50088 # this is the port used by the nmos container to communicate with ffmpeg pipeline
      nmosPort: 5004 # this is the port used by the nmos container to manage node via REST API
      environmentVariables:
        - "http_proxy="
        - "https_proxy="
      volumes:
        videos: /root #for videos to be stored
        dri: /usr/lib/x86_64-linux-gnu/dri
        kahawai: /tmp/kahawai_lcore.lock
        devnull: /dev/null
        tmpHugepages: /tmp/hugepages
        hugepages: /hugepages
        imtl: /var/run/imtl
        shm: /dev/shm
      devices:
        vfio: /dev/vfio
        dri: /dev/dri
      custom_network:  # custom network = false means that the container will be run in the host docker network
        enable: false
        ip: 10.123.x.x # this IP address is crucial to be exposed explicitly to the NMOS node. It should be the same as host IP address or localhost
    nmosClient:
      name: bcs-ffmpeg-pipeline-nmos-client-tx
      imageAndTag: tiber-broadcast-suite-nmos-node:latest # built locally
      environmentVariables:
        - "http_proxy="
        - "https_proxy="
        - "VFIO_PORT_TX=0000:ca:11.0" # this is the PCI address of the vfio device - MANDATORY!
      nmosConfigPath: /root/path/to/intel-node-tx/json/file
      nmosConfigFileName: intel-node-tx.json
      custom_network:  # custom network = false means that the container will be run in the host docker network
        enable: false
Parameters explaination#
k8s: falseit indicates single node scenario: the configuration is designed for a single-node setup, meaning that components mediaProxyAgent and mediaProxyMcm are expected to run on the same machine. Consistency: The configurations for mediaProxyAgent and mediaProxyMcm must be identical within the same network/setup/host to ensure proper communication. Modes: The k8s flag determines whether the setup is for Kubernetes (k8s: true) or Docker (k8s: false).runOncesection defines the containers that need to be run once during the setup.For
mediaProxyAgent,imagemust be built locally (instructios above). Ports:gRPCPortis used by the agent for gRPC communication.restPortis used for REST API communication. Custom Network:enable: false: the container will use the host’s Docker network.For
mediaProxyMcmimagemust be built locally.iterfaceNameis physical network interface used by the container.volumesshould be existing paths on the host. Custom Network:enable: false: The container will use the host’s Docker network.
workloadToBeRunsection defines the workloads that need to be executed.
For
ffmpegPipelineimagemust be built locally. Ports:gRPCPortis used by the NMOS container to communicate with the FFmpeg pipeline.nmosPortis used by the NMOS container for NMOS REST API communication. For example this port is used by NMOS registry or NMOS controller to send the REST requests to your NMOS node. Environment Variables:http_proxyandhttps_proxyare proxy settings (left empty in this configuration).volumesmaps various host directories to the container for video storage, device access, and shared memory.volumes’ paths should be existing paths on the host.videosvolume points to location where videos are stored.devicesmaps VFIO and DRI devices from the host to the container. Custom Network:enable: falsemeans the container will use the host’s Docker network.ip: 10.123.x.xis the IP address must match the host’s IP or localhost for proper NMOS node communication.For
nmosClientimagemust be built locally. Environment Variables:VFIO_PORT_TXis the PCI address of the VFIO device (mandatory for proper operation). NMOS Configuration:nmosConfigPathis path to the NMOS configuration JSON file.nmosConfigFileNameis name of the NMOS configuration file. Custom Network:enable: falsemeans the container will use the host’s Docker network.
In the case of using this file with the custom_network: true (files <repo>/launcher/configuration_files/bcslauncher-static-config-custom-net-.*.yaml) the only diffrence is in the snippet:
custom_network:
  enable: true
  name: <bcs-custom-net>
  ip: <ip-address>
You need to provide the name of docker network (for example the one that is created using script <repo>/scripts/first_run.sh and you can list its name $ docker network ls) and assign the IP address according to defined rules and subnet.
IMPORTANT NOTE!It is worth noting that workloads under keyrunOnceare configurable globally and only once, whereasworkloadToBeRuncan be defined many times for diffrent workloads (so under the same path, change the content of the file). The flag should be set ask8s: false.
How to run BCS launcher for docker containers?#
cd <repo>/launcher/cmd/
go build main.go
./main --bcs-config-path=<pass/path/to/file/launcher/configuration_files/<<your configuration file>>.yaml>
# Alternatively instead of go build main.go && ./main, you can type: go run main.go --bcs-config-path=<pass/path/to/file/launcher/configuration_files/<<your configuration file>>.yaml>
To Deploy on the cluster (kubernetes sceario)#
IMPORTANT NOTE! The prerequisite is to prepare cluster (for example the simplest one using the link below): Creating a cluster with kubeadm
NOTE: Make sure that you have built all necessary images from the section 4.1 Use BCS Launcher app.
Modify ConfigMap <repo>/launcher/configuration_files/bcslauncher-k8s-config-map.yaml. k8s: true should be set. Resources for media proxy and mesh agent are only configured once within runtime of the cluster. Configuration can be changed in above mentioned ConfigMap, however the changes will be applied when reconciler loop runs in BCS launcher controller (e.g. after applying/updating any BcsConfig custom resource)
Explanation of ConfigMap#
It is used to store configuration data that can be consumed by applications running in a Kubernetes cluster.
data holds the actual configuration data. The data section contains a single key, config.yaml, which holds a multi-line YAML configuration. This is where the application-specific configuration is defined.
k8s
A boolean flag (
true) indicating Kubernetes-specific behavior.
definition
Contains the configuration for different components of the system.
Component-Specific Keys#
Each component (e.g., meshAgent, mediaProxy, mtlManager) has its own configuration:
meshAgent
image: Docker image for themeshAgentcomponent.restPort/grpcPort: ports used for REST and gRPC communication.requests: resource requests for CPU and memory (minimum guaranteed resources).limits: resource limits for CPU and memory (maximum allowed resources).scheduleOnNode: node selector to schedule the pod on specific nodes (e.g., nodes with the labelnode-role.kubernetes.io/worker=true). [optional]doNotScheduleOnNode: node selector to omit schedule process of the pod on specific nodes [optional]
mediaProxy#
image: Docker image for themediaProxycomponent.command/args: command and arguments to run the container.grpcPort/sdkPort: ports for gRPC and SDK communication.requests/limits: resource requests and limits, including hugepages for memory optimization.volumes: refines volume mounts for the container (e.g.,memif,vfio).pvHostPath: host path for persistent volume.pvStorageClass: storage class for the persistent volume.pvStorage/pvcStorage: storage size for the persistent volume and PVC.pvcAssignedName: name of the PersistentVolumeClaim (PVC).scheduleOnNode: node selector to schedule the pod on specific nodes (e.g., nodes with the labelnode-role.kubernetes.io/worker=true). [optional]doNotScheduleOnNode: node selector to omit schedule process of the pod on specific nodes [optional]
mtlManager
image: Docker image for themtlManagercomponent.requests/limits: Resource requests and limits.volumes: Volume mounts for the container (e.g.,imtlHostPath,bpfPath).scheduleOnNode: node selector to schedule the pod on specific nodes (e.g., nodes with the labelnode-role.kubernetes.io/worker=true). [optional]doNotScheduleOnNode: node selector to omit schedule process of the pod on specific nodes [optional]
Modify CustomResource called BcsConfig (custom object in Kubernetes)<repo>/launcher/configuration_files/bcsconfig-k8s-custom-resource-example.yaml to prepare information for bcs pipeline and NMOS node. There may be many custom resources that specifies diffrent workloads with NMOS node.
Component-specific keys under spec#
name: the name of the application (tiber-broadcast-suite).namespace: the namespace where the application operates (bcs).app: configuration for the main stream application (e.g. ffmpeg).image: container image to use (e.g. built locally)grpcPort: gRPC port exposed by the application (50051).resources: resource requests and limits for the container:requests: minimum resources required (e.g., 500m CPU, 256Mi memory and hugepages).limits: maximum resources allowed (e.g., 1000m CPU, 512Mi memory and hugepages).environmentVariables: Environment variables for the container (e.g.,http_proxyandhttps_proxy).volumes: Volume mappings for the container (e.g., videos mapped to location where videos are stored on the host).
nmos: configuration for the NMOS component:image: the container image for NMOS (built locally)args: command-line arguments for the container. As an argument, a path to NMOS configuration file is passed:["config/config.json"]. It should be left as default, because it will be mounted as volume in ConfigMapenvironmentVariables: environment variables specific to NMOS. The most important ENVIRONMENT VARIABLE calledVFIO_PORT_TX or VFIO_PORT_RX(depending on scenario):
    - name: "http_proxy"
      value: ""
    - name: "https_proxy"
      value: ""
    - name: "VFIO_PORT_TX"
      value: "0000:ca:11.0"
nmosApiNodePort: node port for the NMOS API.resources: resource requests and limits for the NMOS container.nmosInputFile: configuration for NMOS input. The detailed parameters are described under<repo>/src/nmos/nmos-node/README.md. Remeber to adjust this configuration too to your needs!
BCS pod launcher installer in k8s cluster:
Users can just run kubectl apply -f
Deploy
cd <repo>/launcher/
kubectl apply -f ./configuration_files/bcslauncher-k8s-config-map.yaml
kubectl apply -f ./configuration_files/bcsconfig-crd.yaml
kubectl apply -f ./configuration_files/bcs-launcher.yaml
# Check if BCS launcher controller is up-and-running
kubectl get pods -n bcs
# If it works fine, adjust to your needs: ./configuration_files/bcsconfig-k8s-custom-resource-.*.yaml
kubectl apply -f ./configuration_files/bcsconfig-k8s-custom-resource-example.yaml
Delete
kubectl delete -f ./configuration_files/bcslauncher-k8s-config-map.yaml
kubectl delete -f ./configuration_files/bcsconfig-crd.yaml
kubectl delete -f ./configuration_files/bcs-launcher.yaml
kubectl delete -f ./configuration_files/bcsconfig-k8s-custom-resource-example.yaml
BCS pod launcher roles of files in k8s cluster:
configuration_files/bcslauncher-k8s-config-map.yaml-> configmap for setting up the mode of launcher.k8s: truedefines kuberenets mode. Currently, you should not modify this in that file.configuration_files/bcsconfig-crd.yaml-> object definition - CustomResourceDefinition forBcsConfigconfiguration_files/bcs-launcher.yaml-> install set of kuberenetes resources that are needed to run bcs pod luancher, no additional configuration requiredconfiguration_files/bcsconfig-k8s-custom-resource-example.yaml-> exampleBcsConfigfile that it is an input to provide information about bcs ffmpeg piepeline and NMOS client, you can adjust file to your needs
[OUTDATED manual because these topics below are encapsulated by containers/pods and BCS launcher]
1. Run sample pipelines#
The Intel® Tiber™ Broadcast Suite is a package designed for creation of high-performance and high-quality solutions used in live video production.
Video pipelines described below (sections 2. - 7.) are built using Intel-optimized version of FFmpeg and combine: media transport protocols compliant with SMPTE ST 2110, JPEG XS encoder and decoder, GPU media processing and rendering.
session A, session B etc. mark separate shell (terminal) sessions. As the Suite is a containerized solution, those sessions can be opened on a single server or multiple servers - on systems connected with each other, after the ports are exposed and IP addresses aligned in pipeline commands.
1.1. Sample pipelines setup#
To execute Intel® Tiber™ Broadcast Suite pipelines, ensure you have a src folder in your Current Working Directory (CWD) containing three raw videos. These videos should be in the yuv422p10le 25fps format, which refers to 422 YUV sampling at 10-bit little endian 25 frames per second. Additionally, make sure you have the necessary environment variables set. You can use the VARIABLES.rc file in your Current Working Directory for that purpose.
1.2. Providing input files#
1.2.1. You can provide your own input files#
# Create the src directory if it doesn't exist
mkdir src

# Move your sample videos to the src directory
cp name_of_your_video.yuv src/1080p_yuv422_10b_1.yuv
cp name_of_your_video2.yuv src/1080p_yuv422_10b_2.yuv
cp name_of_your_video3.yuv src/2160p_yuv422_10b.yuv
1.2.2. Alternatively, You Can Also Use FFmpeg to Generate Videos with This Format#
# Create the src directory if it doesn't exist
mkdir -p src

# Generate the first 1080p video
ffmpeg -an -y -f lavfi \
-i testsrc=d=5:s=1920x1080:r=25,format=yuv422p10le \
-f rawvideo  src/1080p_yuv422_10b_1.yuv

# Generate the second 1080p video
ffmpeg -an -y -f lavfi \
-i testsrc=d=5:s=1920x1080:r=25,format=yuv422p10le \
-f rawvideo  src/1080p_yuv422_10b_2.yuv

# Generate the 2160p video
ffmpeg -an -y -f lavfi \
-i testsrc=d=5:s=3840x2160:r=25,format=yuv422p10le \
-f rawvideo src/2160p_yuv422_10b.yuv
1.3. Setting Up VFIO-PCI Addresses#
To configure your VFIO-PCI (DPDK binded devices) for use, you’ll need to add their PCI addresses to the VARIABLES.rc file located in your Current Working Directory (CWD). Follow these steps to ensure proper setup:
# Check your vfio-pci device PCI address
dpdk-devbind.py -s
Next, create variables in the VARIABLES.rc file to store the PCI addresses for the transmit, receive, and processing devices. Use the following format:
VFIO_PORT_T - Address for the transmit device.
VFIO_PORT_R - Address for the receive device.
VFIO_PORT_PROC - Address for the processing device.
# Example commands to set VFIO PCI addresses
echo "VFIO_PORT_T=0000:b1:00.0" >> VARIABLES.rc
echo "VFIO_PORT_R=0000:b1:00.1" >> VARIABLES.rc
echo "VFIO_PORT_PROC=0000:b1:00.2" >> VARIABLES.rc
Make sure to replace 0000:b1:00.0, 0000:b1:00.1, and 0000:b1:00.2 with the actual PCI addresses you obtained from the dpdk-devbind.py command.
By following these steps, you’ll have correctly configured the necessary variables in your VARIABLES.rc file for your DPDK binded devices.
1.4. Optional for bare-metal#
📝 Notice: To run the pipelines using the bare-metal installation of the Intel® Tiber™ Broadcast Suite, include the -l argument with the pipeline scripts:
./pipelines/<pipelines_script_example>.sh -l
in local mode you also need to have kahawai.json in your Current Working Directory kahawai.json.
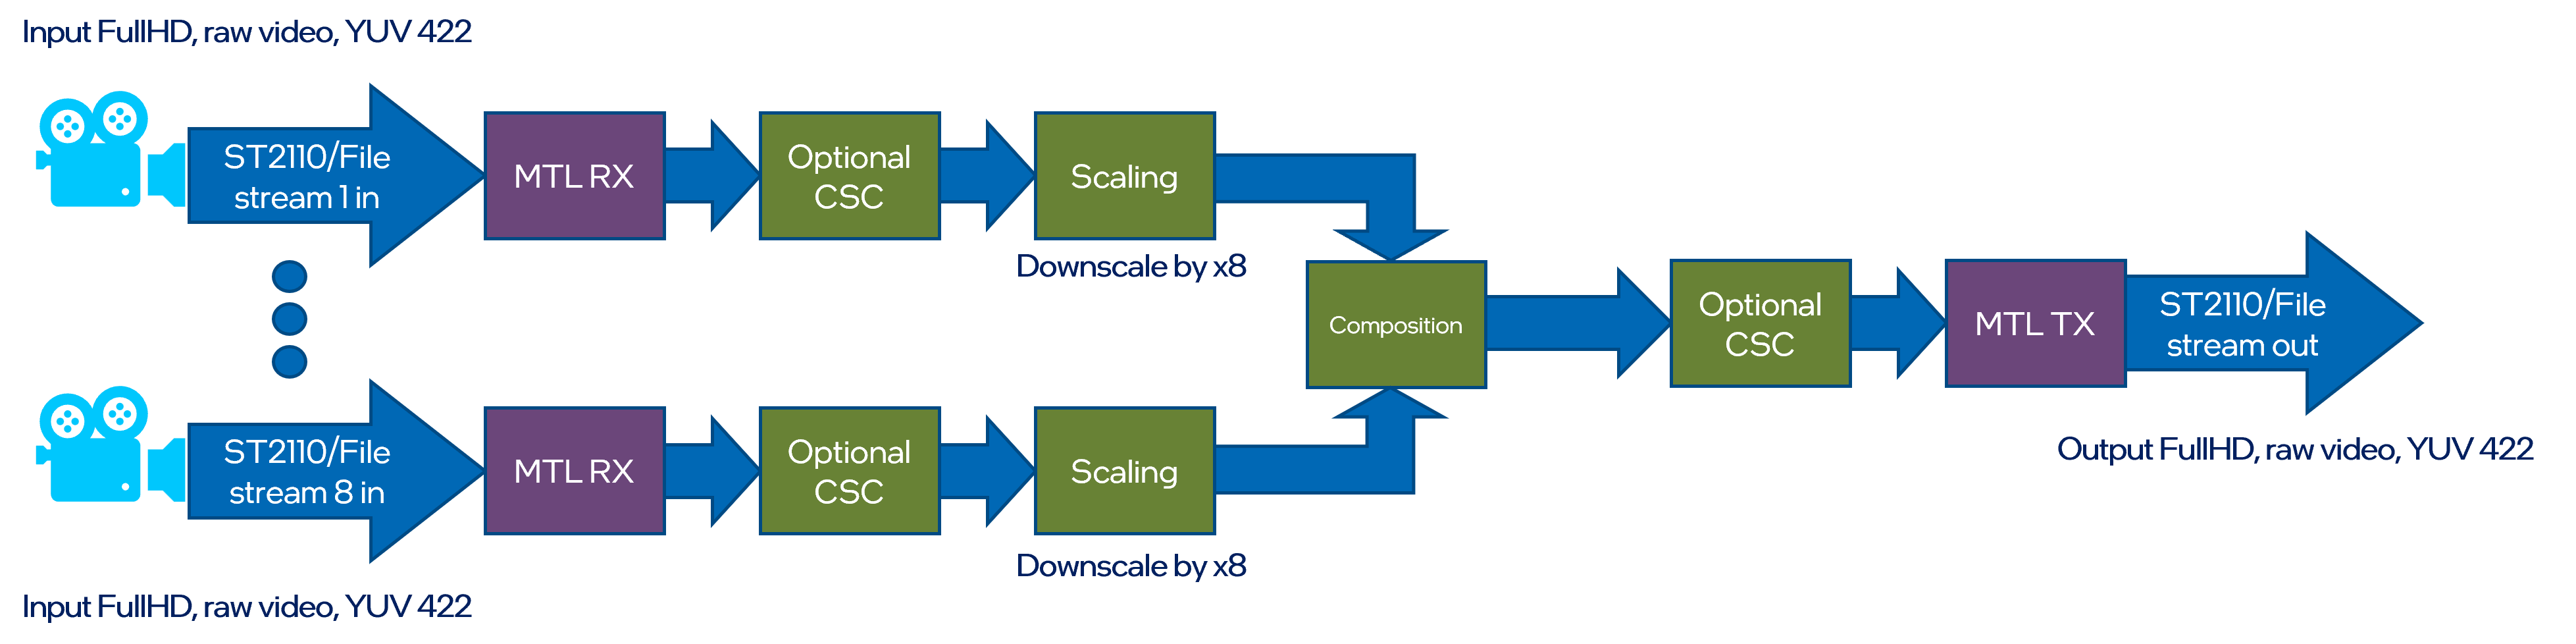
2. Multiviewer#
Input streams from eight ST 2110-20 cameras are scaled down and composed into a tiled 4x2 multi-view of all inputs on a single frame.
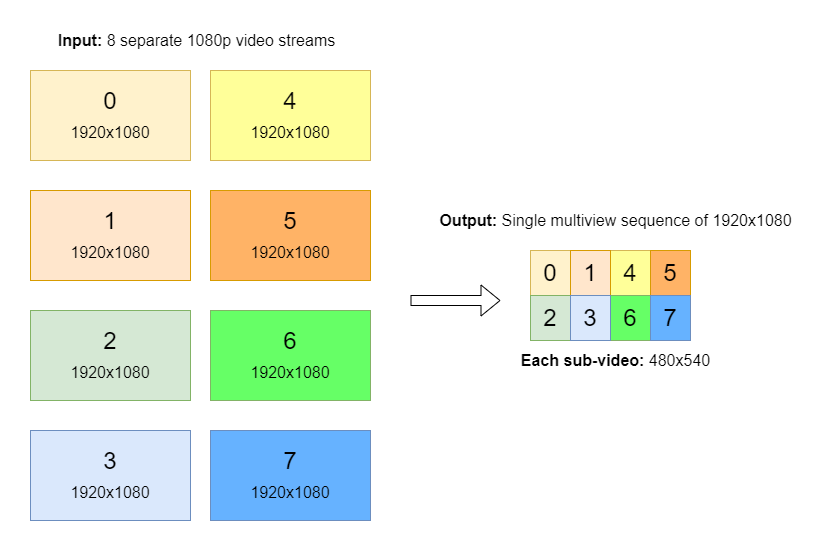
Scaling and composition are examplary operations that can be replaced by customers with their own visualization apps, for example OpenGL- or Vulcan-based.
Pipeline outputs a single ST 2110 stream.
The example also shows how to use GPU capture to encode a secondary AVC/HEVC stream that can be transmitted with WebRTC for preview.
Execute a following set of scripts in according terminal sessions to run the Multiviewer pipeline:
session A > multiviewer_tx.sh
session B > multiviewer_process.sh
session C > multiviewer_rx.sh
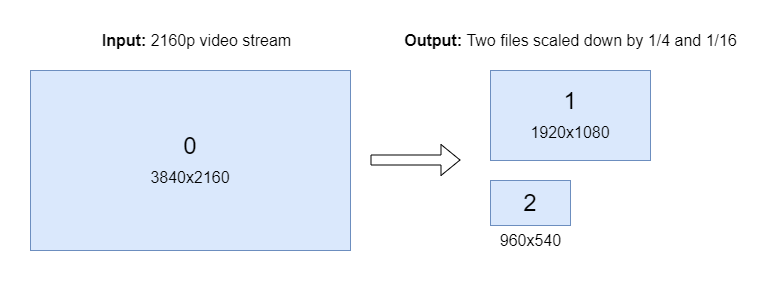
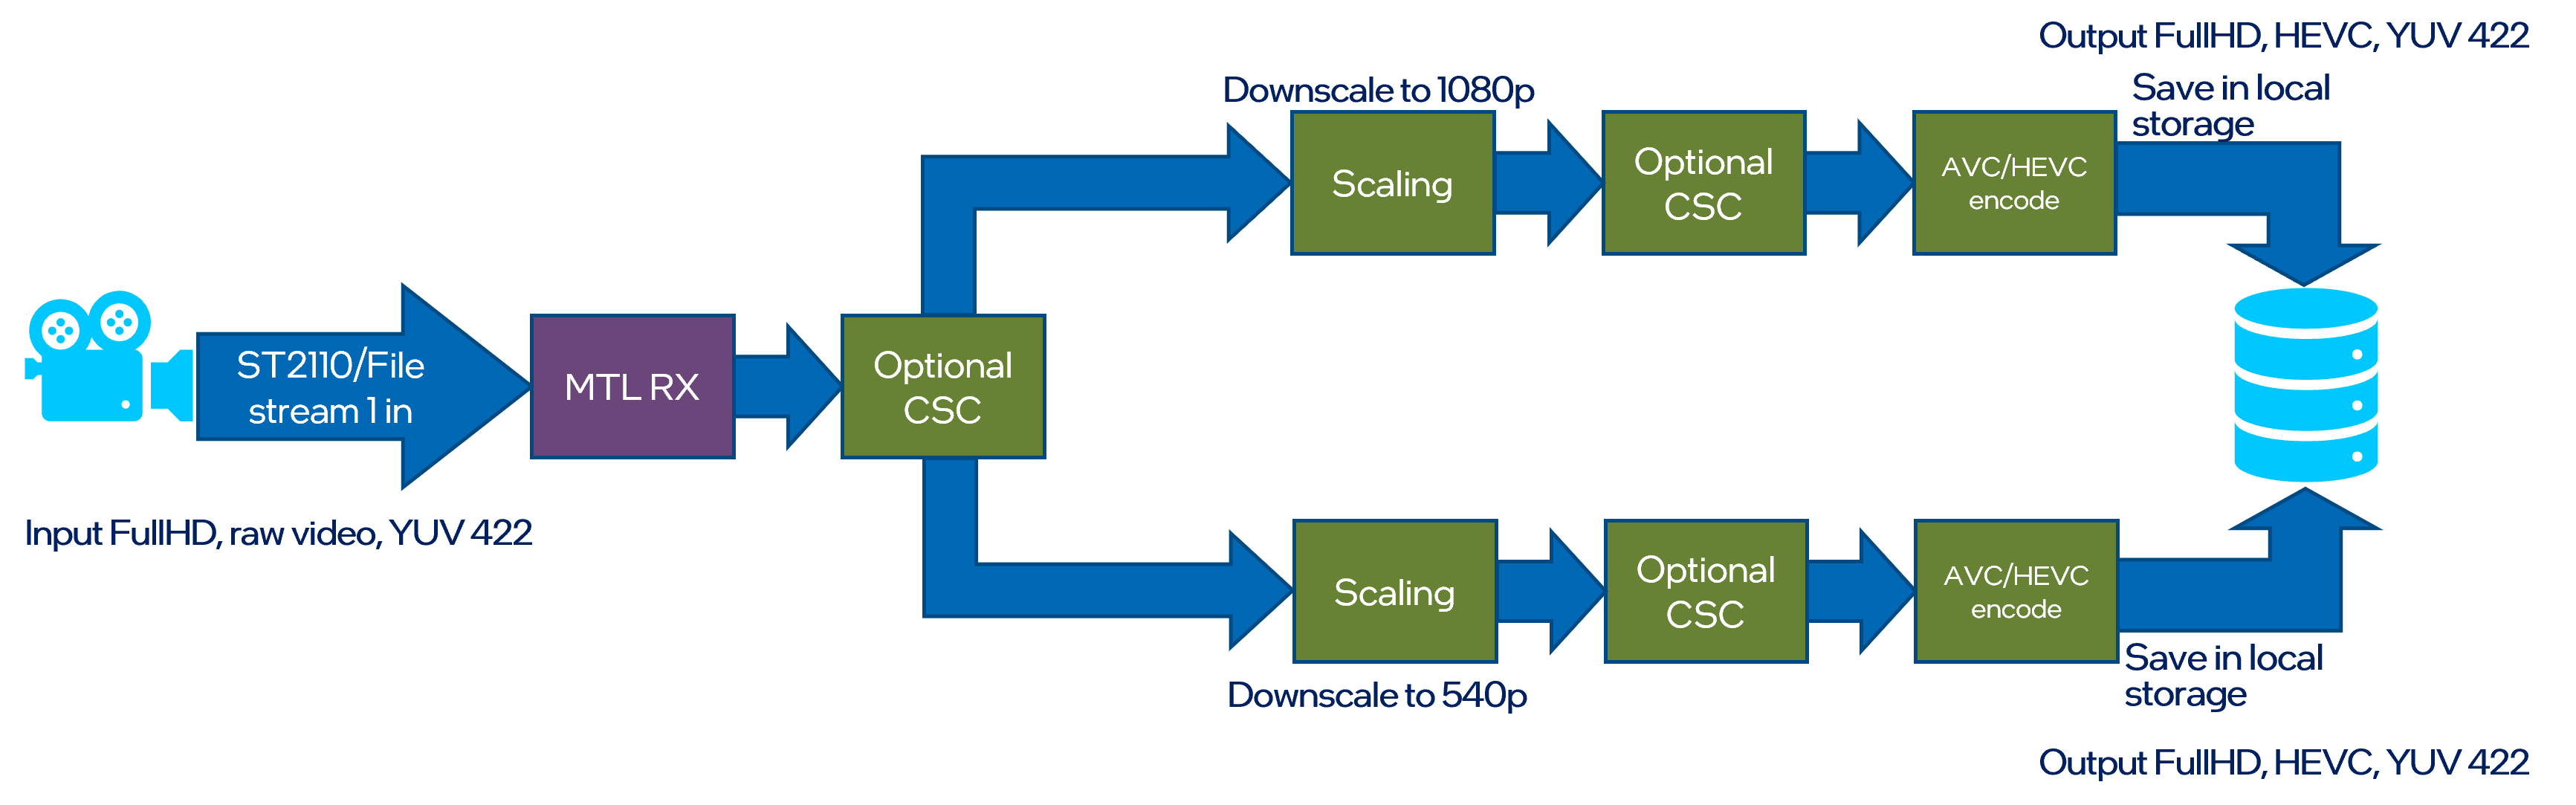
3. Recorder#
Input streams from ST 2110-20 camera is split to two streams with different 1/4 and 1/16 pixelwise scaling. Scaled outputs are stored on local drive.
Execute a following set of scripts in according terminal sessions to run the Recorder pipeline:
session A > recorder_tx.sh
session B > recorder_rx.sh
4. Replay#
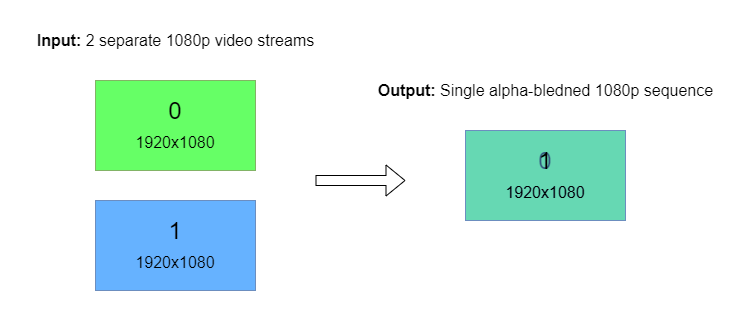
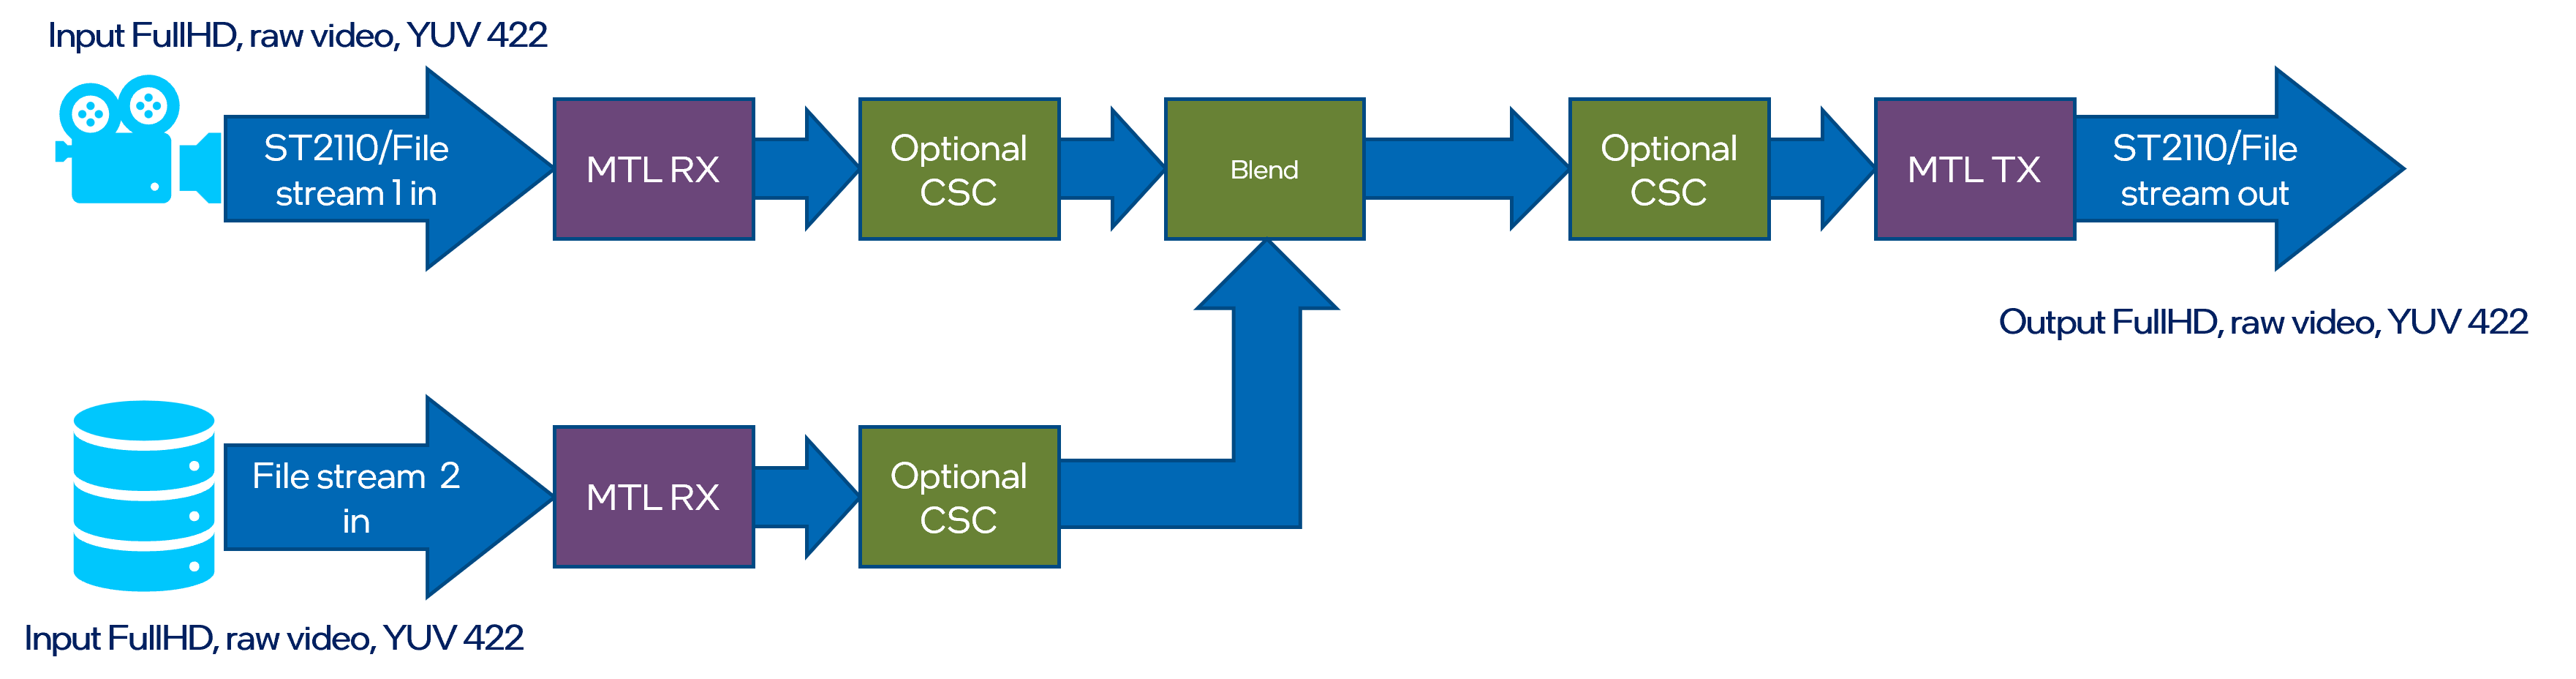
Input streams from two ST 2110-20 camera and are blended together. Blended output is send out via ST 2110 stream.
Execute a following set of scripts in according terminal sessions to run the Replay pipeline:
session A > replay_tx.sh
session B > replay_process.sh
session C > replay_rx.sh
5. Upscale#
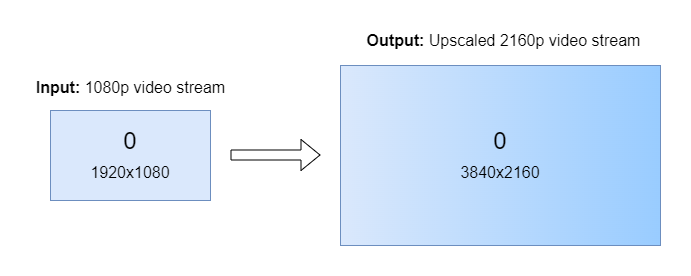
Input streams from ST 2110-20 camera is scaled up using Video Super Resolution from FullHD to the 4K resolution. Output is send out via ST 2110-20 stream.

Execute a following set of scripts in according terminal sessions to run the Upscale pipeline:
session A > upscale_tx.sh
session B > upscale_process.sh
session C > upscale_rx.sh
6. JPEG XS#
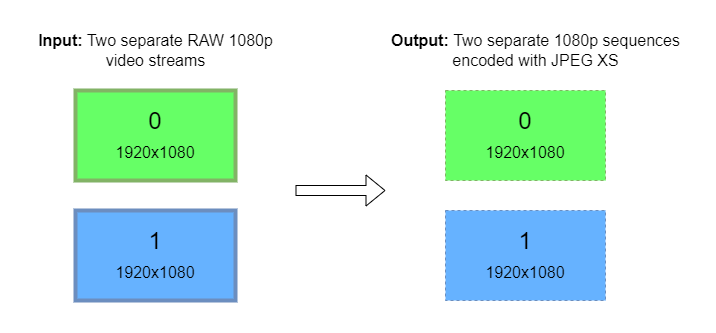
Two input streams from local drive are encoded using JPEG XS codec and send out using ST 2110-22 streams. Input streams from two ST 2110-22 camera are decoded using JPEG XS codec stored on local drive.
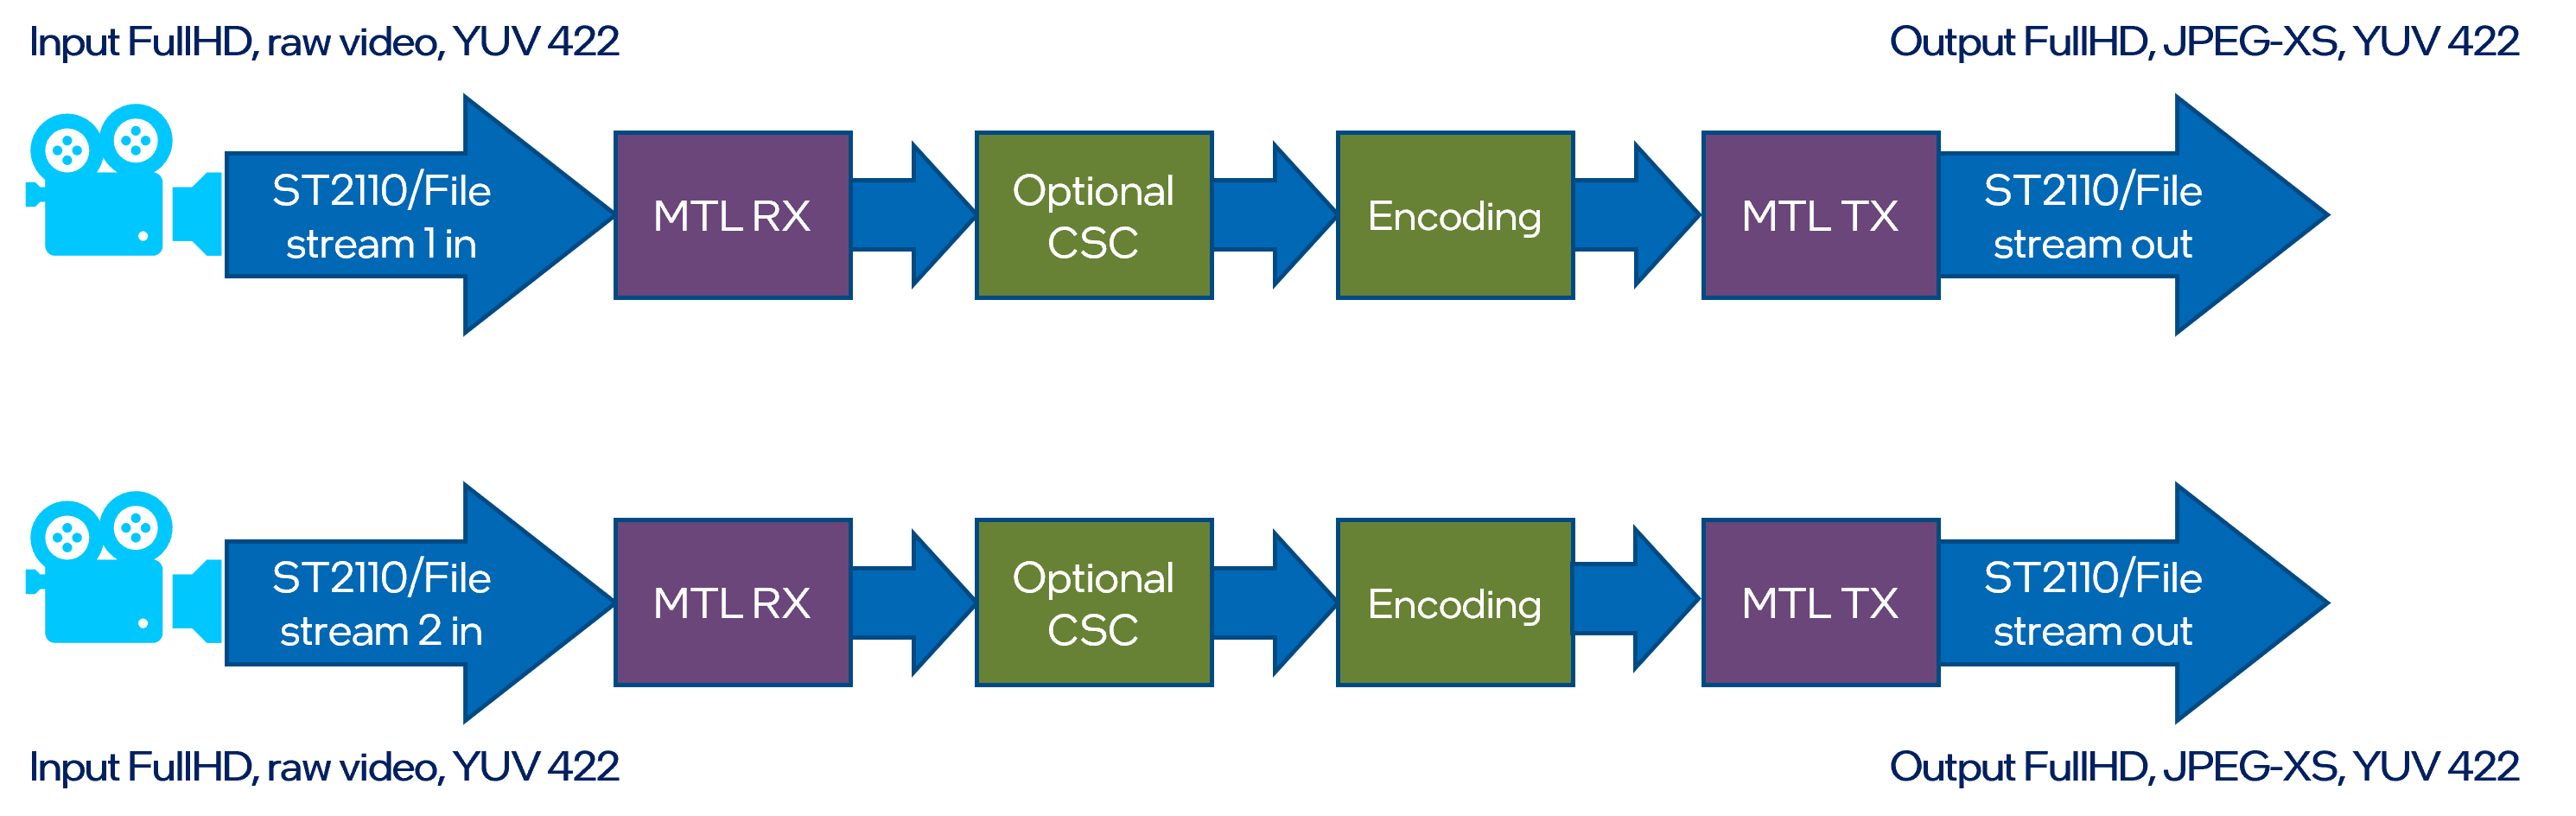
Execute a following set of scripts in according terminal sessions to run the JPEG XS pipeline:
session A > jpeg_xs_tx.sh
session B > jpeg_xs_rx.sh
7. JPEG XS over Media Communications Mesh#
Two input streams from local drive are encoded using JPEG XS codec and send out via Media Communications Mesh using ST2110-22 streams. Input streams from two ST2110-22 cameras are decoded using JPEG XS codec stored on local drive.
⚠️ Warning: You need to have the Media Proxy installed to run this pipeline.
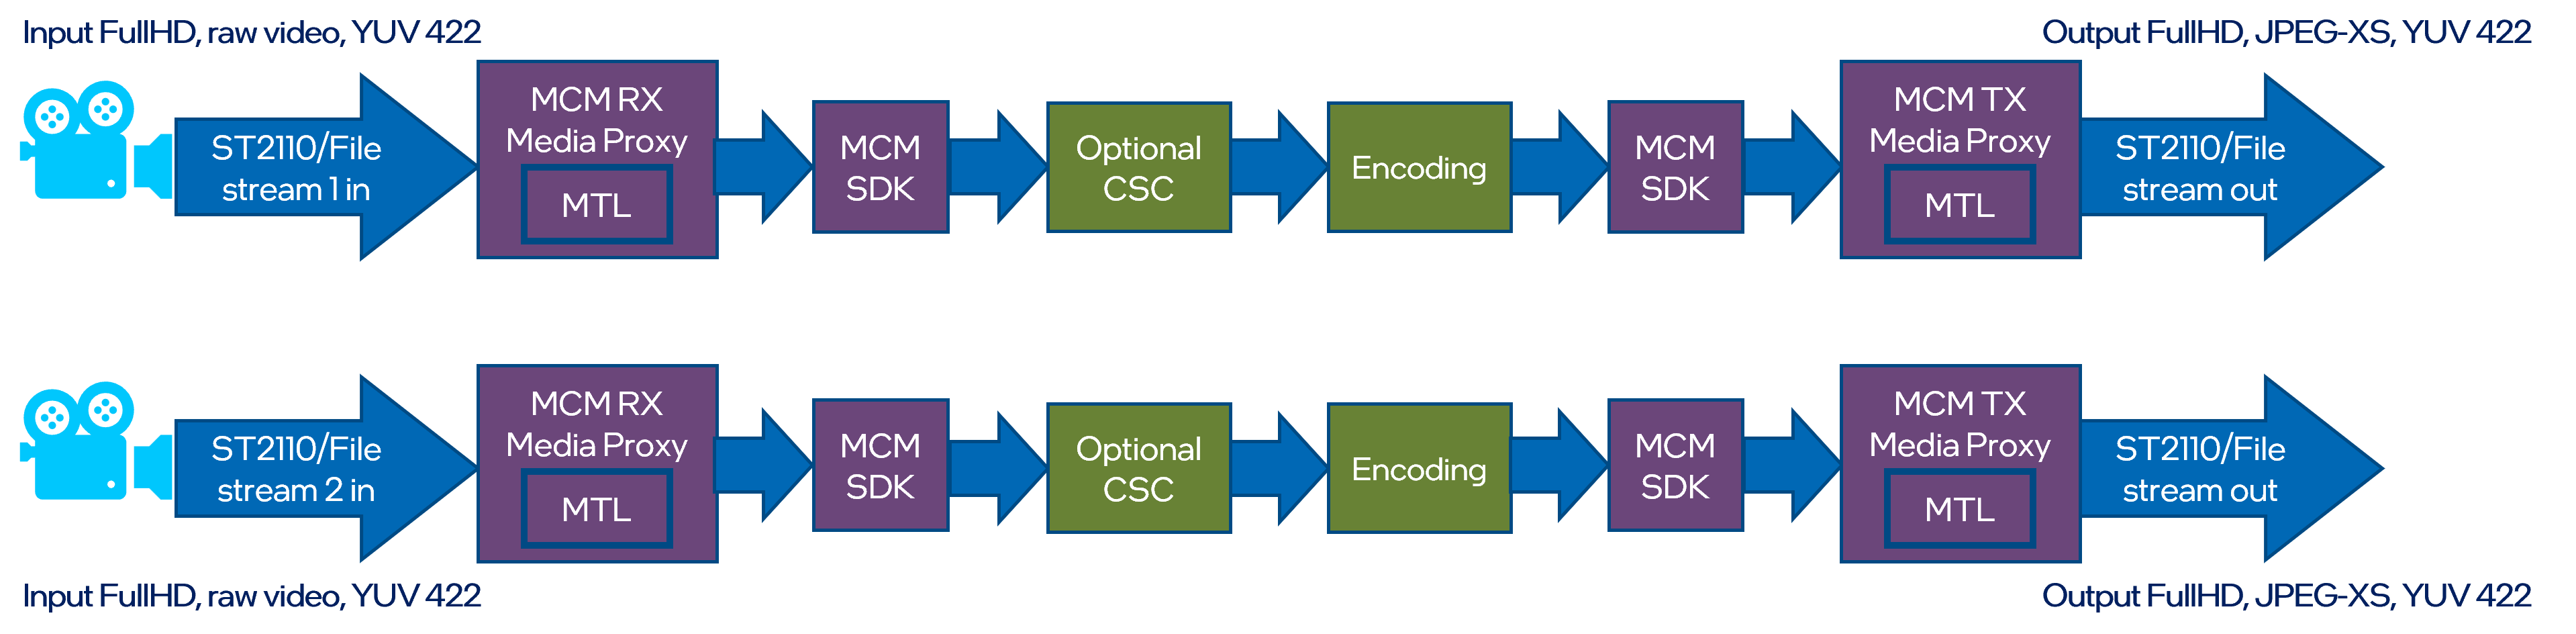
Example command to run the pipeline:
session A > mcm_media_proxy_rx.sh
session B > mcm_media_proxy_tx.sh
session C > mcm_jpeg_xs_rx.sh
session D > mcm_jpeg_xs_tx.sh